About the Program
 IMFX File Viewer (format of the Customs Service of Ukraine)
A program for viewing IMFX messages used for data exchange between customs authorities and declarants during customs clearance. The program implements the ability to retrieve files for viewing directly from mail servers, thus allowing real-time monitoring of the customs clearance process.
You can view additional information, ask a question, or make a suggestion on the application's page on Facebook.
Installation
Since the program does not have built-in tools for viewing files in PDF and XPS formats, which may be contained inside IMFX files, please additionally install any application for viewing files in these formats, for example Document Viewer.
Usage
Using the program, you can view both locally stored IMFX format files on the device and files sent by customs to your email box used for customs clearance.
If you plan to use the program to view messages received from mail services, then you need to add accounts for synchronization. Otherwise, no configuration is needed to use the program. Read below on how to add accounts.
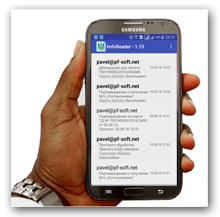
All viewed files are saved in the list on the application's main page.
To open a locally stored file for viewing, use the "Open" item in the main menu and select the desired file in the file selection dialog that appears.
To view files from your mailbox - use the "Refresh" item in the main menu or pull down the file list window. After this, the download of files from the mailboxes specified in your account settings should start. Upon completion of synchronization, new files will appear in the list and you can view their contents. Also, the program automatically launches synchronization in the background at certain intervals. If new messages are detected in this case, a corresponding notification will appear in the notification panel.
Forwarding Messages
Using the application, you can forward received files either in full (in the original IMFX format), or each document contained in the message separately in its corresponding format (html, pdf, xps, etc.).
 Forwarding capabilities are limited only by the capabilities of the file sharing applications installed on your device. If the appropriate software is installed, you can forward a file or document not only to
email but also to Skype, Viber, OneDrive, Google Drive, VKontakte, etc.
Forwarding capabilities are limited only by the capabilities of the file sharing applications installed on your device. If the appropriate software is installed, you can forward a file or document not only to
email but also to Skype, Viber, OneDrive, Google Drive, VKontakte, etc.
You can forward a message in its entirety in the following ways:
- In the main application window, long-press the corresponding message until the context menu appears, then select the "Forward" item in it.
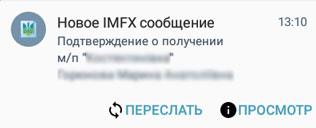
- Use the "Forward" button in the expanded version of the new message notification. To switch the notification to expanded mode, press and hold it with your finger and pull down.
You can forward an individual document from a message in the following ways:
- In the main application window, long-press the corresponding message until the context menu appears, then select the "View" item in it. After the list of all message documents is displayed, long-press the desired document until the context menu appears, then select the "Forward" item in it.
- You can go to the message content directly from the new message notification by using the "View" button. Then proceed similarly to the previous point.
Configuration
Synchronization with Mail Servers
- Adding Accounts
-
- Open the device settings section (not the program settings, but the device itself - tablet or phone). Usually, this can be done by pressing the "Menu" button on the home screen, and then - "Settings" (a button with a gear icon).
- Find the "Personal" category and tap on "Accounts".
- Tap "Add account", which is at the very end of the list. After this, a list of all account types available on the device will appear. Select "ImfxReader" from this list.
-
In the new account dialog that appears, fill in all the required fields and tap the "Add" button.
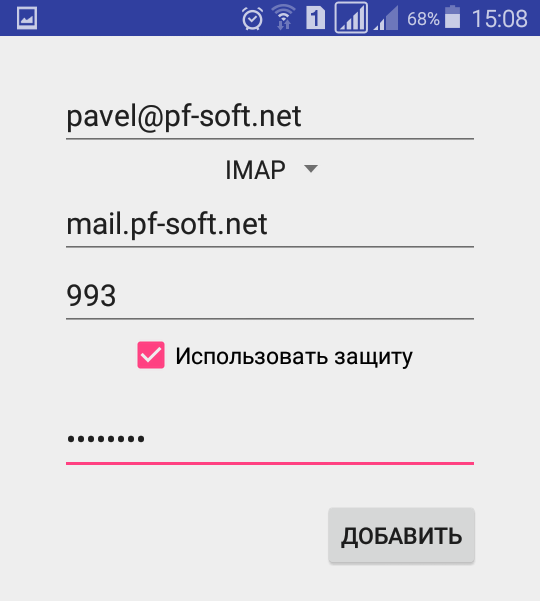
Specify the account parameters as follows:
- Login - enter your email address to which messages from customs arrive (usually this is the one used in most cases for authorization on mail services)
- Protocol type, Server, Port, Security - these parameters should be set automatically after entering the login, if you use mail services whose settings are already included in the program (gmail.com, mail.ru, ukr.net, yandex.ru, meta.ua). If you use other services, find the necessary information in the help guides of those services.
- Password - enter your password to access the mailbox.
- By default, checking for new messages from customs on mail servers occurs every 15 minutes. If you need to change this interval - use the "Settings" item in the main menu, then go to the "Synchronization" tab and set the required value.
The program can work with an unlimited number of mail accounts.
Notification Settings
To configure the parameters of notifications that are created when new messages are detected in mailboxes, use the "Settings" item in the main menu and go to the "Notifications" tab. Here you can select a ringtone, disable / enable vibration, or disable notifications altogether.
Problems and Solutions
License is Invalid
The appearance of a dialog box with a message that the application license is invalid is possible in the following cases:
-
No internet connection
Application license verification occurs every time the application is started (but no more than once a day), and for its implementation, a direct connection to the internet is required. To resolve this issue, check the network connection and click the "Retry" button in the dialog box. -
Attempt to use the application on multiple devices
The application license grants the right to use it on only one device within a single Google Play account. Control of application usage on devices is carried out by unique identifiers (ID) of Android OS devices. During the first license check, the device ID is linked to the license, and if you try to run the application on another device (with a different ID), the license will fail verification and a dialog box with an error will appear. The error also occurs if you performed actions on the device that lead to a change in the device ID (for example, flashing the OS).To resolve this issue, use the option that best suits you:
-
If you need to use the application on multiple devices within one Google Play account, you will have to purchase a license for additional devices. To do this, go to the program settings, "License" section, and make a purchase.
-
If you do not plan to use the application on multiple devices, but your device ID has changed or you purchased a new device and want to use the application on it (without using it on the old device) - you need to contact the technical support service with a corresponding request. In your request, be sure to specify your device ID and explain the situation.
-
Synchronization is Not Happening
The fact that automatic synchronization with mailboxes is enabled is indicated by the presence of a corresponding notification in the device's notification panel. This notification can be displayed in two modes: normal and expanded. In normal mode, only the text "Monitoring for new IMFX messages is enabled" is displayed, while in expanded mode, the following static information is additionally displayed on a new line for each active account: email, synchronization period for this account, time of last synchronization, and the number of messages downloaded during the last synchronization.

To switch the notification to expanded mode, touch the notification area with your finger and, without releasing, pull down slightly.
With a successfully working synchronization mechanism, the time of the last synchronization should always be greater than the current time minus the synchronization period.
The most common causes of unstable synchronization mechanism operation are the following:
For Android version 6 and above:
- Missing Permissions
Set all required permissions (Contacts and Storage) - Power Saving
Start power saving - uncheck "Immediately", set "When battery charge is 5%" - App Power Consumption
Battery saving by optimizing power consumption of apps that haven't been used for 3 days. May lead to disabling their related notifications.
Find ImfxReader in the list and set it to "Disabled"
For Gmail users:
- App access is blocked
- log into your mailbox via the web interface and make sure there are no messages from Google security service there. If there are such messages - follow the instructions in those messages;
- go to the security settings of your Google account via this link https://myaccount.google.com/security and make sure that in the "Apps with access to your account" section the checkbox "Less secure app access" is not blocked (or is enabled, depending on context and UI) https://www.screencast.com/t/8pXYtQZ0Nytz. (Note: The exact phrasing for "Less secure app access" might vary. The provided link is an example).
For Xiaomi smartphone users:
- The app needs additional permission for auto-start
 Go to:
and make sure the corresponding checkbox is set.
For all users:
-
- log into your mailbox via the web interface and make sure it contains only messages from customs. Delete all other messages.
Messages Are Not Displayed
On devices with Android version 11 and above, there may be problems with displaying messages. To resolve this issue, do the following:
- Using the main menu, go to the application settings section and then to the "Storage" subsection;
- If the "Use memory card" checkbox is set - uncheck it;
- Return to the main application window and start synchronization (refresh) using the menu item or by swiping the message list down.